

Lego Saturn V Release Date
Review: 21309 NASA Apollo Saturn V
Posted by , View image at Flickr
 I was delighted to learn that the Apollo 11 Saturn V had been approved when it was announced last summer and the recent unveiling of the finalised design proved incredibly popular, not only with me but with a considerable number of Brickset members. 21309 NASA Apollo Saturn V contains 1969 pieces in a delightful reference to the year of the Apollo 11 Moon landing and is priced at £109.99 or $119.99 which seems very reasonable to me.
Furthermore, the model measures a tremendous 100 centimetres or 39 inches in height and appears to offer an excellent level of detail and accuracy in relation to the real Saturn V rocket. These factors have generated a great deal of excitement and I am hopeful that the set will surpass all previous LEGO Ideas models in quality. In fact, as someone with a great interest in the history of space exploration it might even count among my favourite sets if it meets my high expectations!
Box and Contents
LEGO Ideas sets are typically packaged in a box with a flap made from a particularly thick cardboard stock. However, this set has evidently been deemed too big for such treatment so the packaging is like that of a standard product, with tape seals at both ends. Nevertheless, the artwork looks splendid and shows the Saturn V having just left Earth's atmosphere with the Moon in the distance. The logo for the NASA Apollo missions also appears alongside a blueprint demonstrating the height of the rocket and an inset image shows the lunar excursion module on the surface of the Moon.

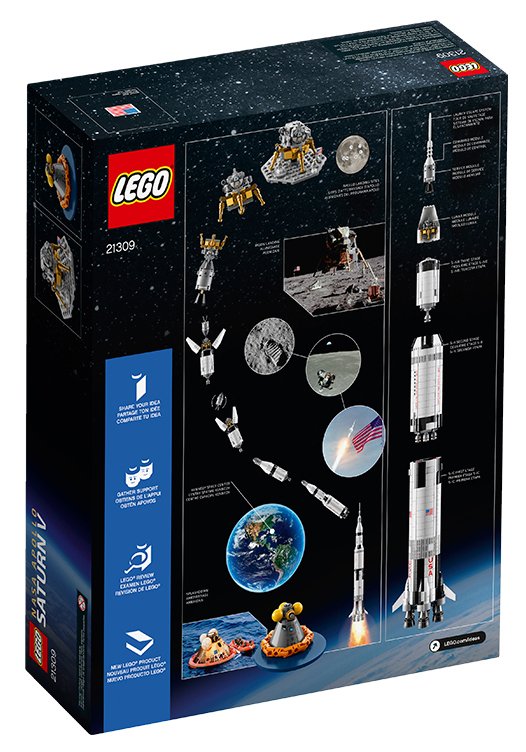
The back of the box explores each stage of the Saturn V and documents the process involved in reaching the Moon. There are also a few photos of the lunar surface and the command module following splashdown in the ocean. This layout looks great and I appreciate the educational value which the set might offer so hope it will be of as much interest to children as it seems to have received from adults.
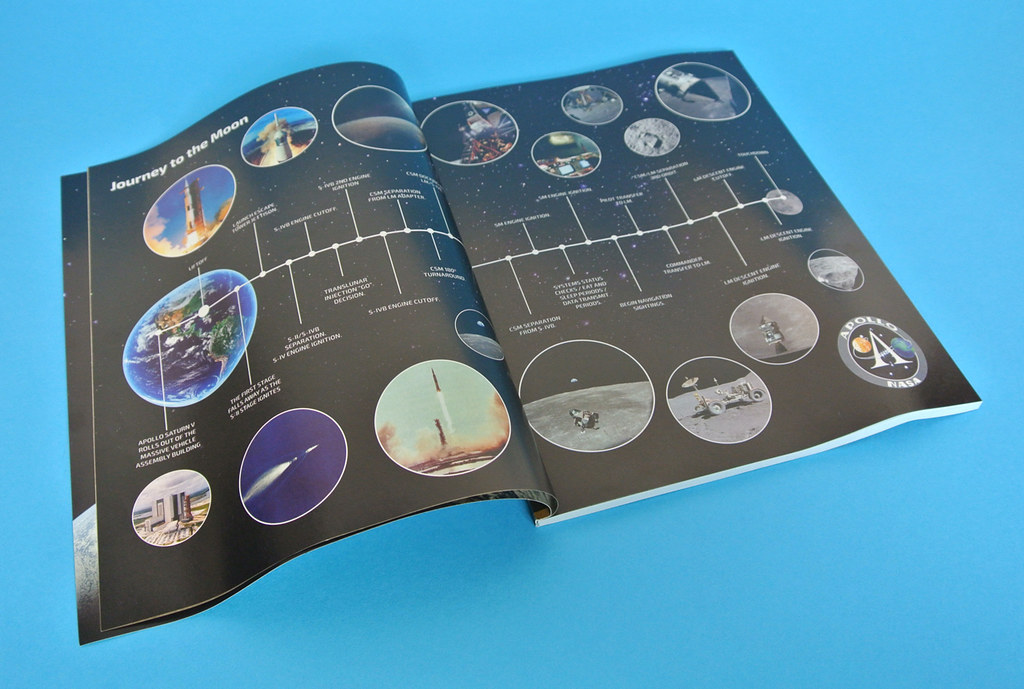
The instruction manual is 184 pages in length and includes some interesting features which describe the fundamental principles of the Apollo program and the successful flight of Apollo 11. This is complemented by some photos of the mission, although one has been introduced showing the Lunar Roving Vehicle which accompanied later Apollo launches.
 View image at flickr
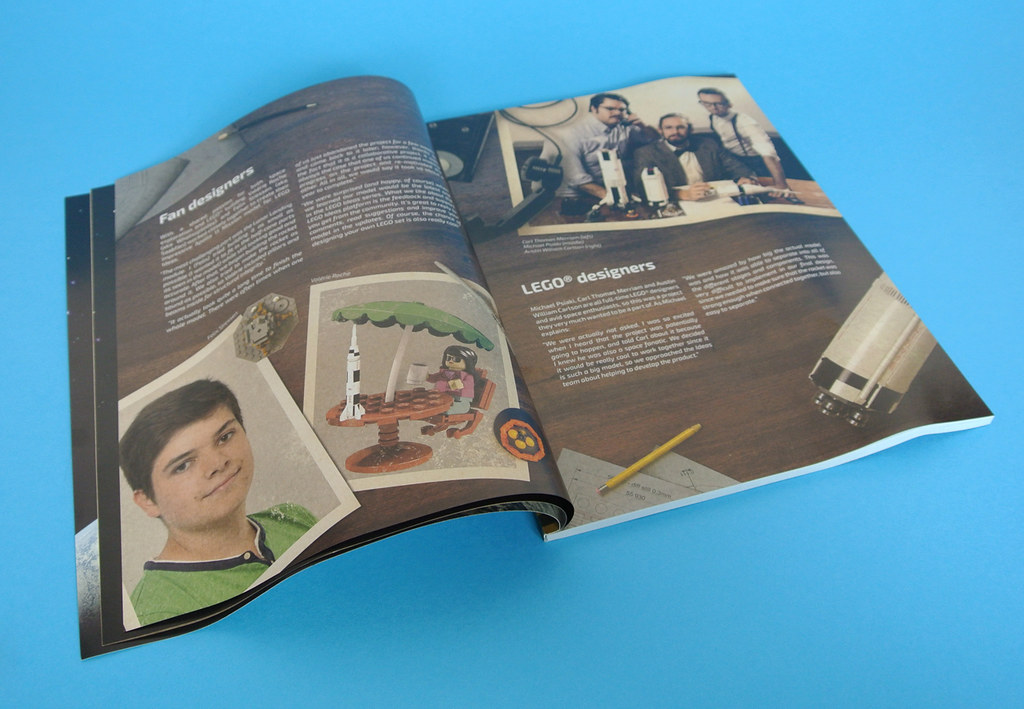
Furthermore, the fan designers Felix Stiessen and Valérie Roche provide some insight into the creation of the Saturn V and comment on the qualities of the LEGO IDEAS platform. There is also a brief word from LEGO designers Carl Merriam, Mike Psiaki and Austin Carlson, all of whom were involved in the development of the final model. They particularly stress the challenge of ensuring that the rocket remained sturdy while also being able to divide into separate stages and I am pleased to say that their efforts were certainly successful.
 View image at flickr
Microfigures
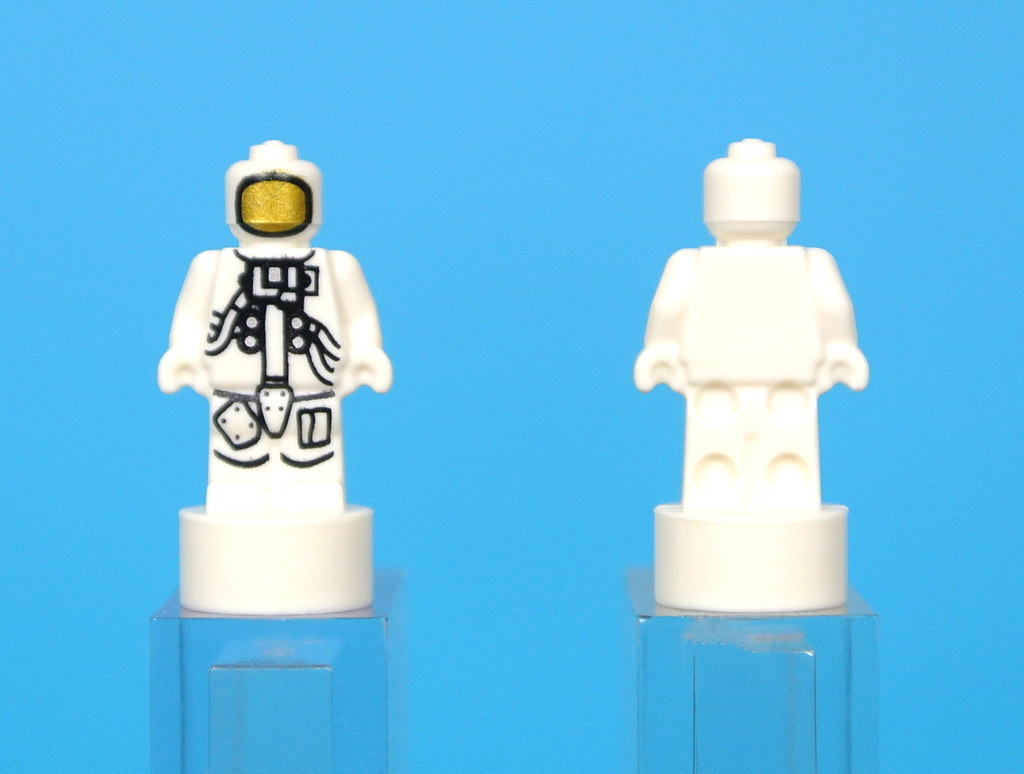
The set comes with three tiny astronauts wearing identical white space suits. The printing is very detailed and shows the Primary Life Support System in the centre of the chest alongside four oxygen distribution hoses and circular nozzle mounts. Similarly authentic designs continue onto the legs, with the biomedical access flap adorning the right thigh and a large pocket on the left.
 View image at flickr
These details are highlighted in black so the metallic gold of the visor really stands out. I appreciate that all three crew members have been included, although there are no features to define which is Neil Armstrong, Buzz Aldrin and Michael Collins so you can use them interchangeably or they could represent an entirely different team if you prefer. A fourth astronaut microfigure is also included as a spare.
The Completed Model
The Saturn V rocket stands exactly 100 centimetres in height, surpassing all but 10181 Eiffel Tower in this regard, so is constructed to an approximate scale of 1:110. It looks absolutely incredible on display, not only because of its extraordinary size but due to the exceptional level of detail which is present from the textured F-1 rocket engines at the base to the 'Q-ball' at the tip of the launch escape tower. I love the balanced black and white colour scheme and the accuracy of these designs is very impressive when compared with the real Apollo 11 launch vehicle.
 View image at flickr
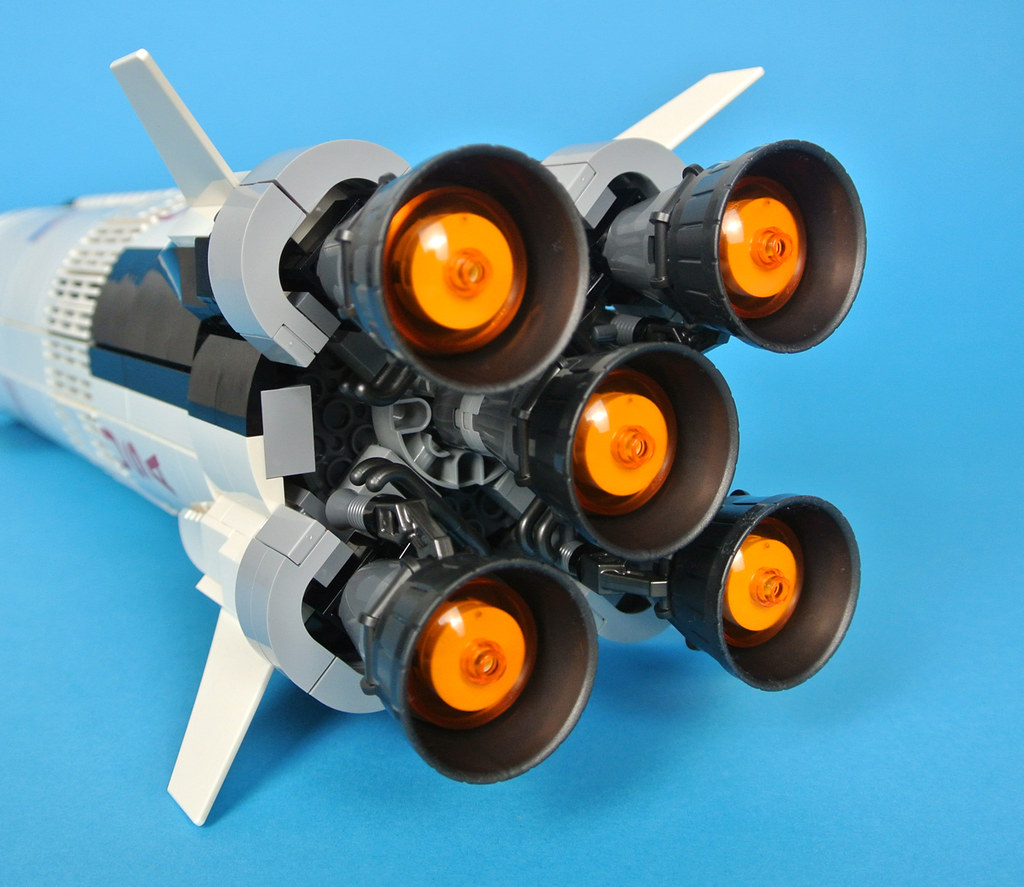
Five Rocketdyne F-1 engines propel the rocket beyond the Earth's atmosphere and these are constructed around a central Technic axle so are sturdily fixed in place. The conical shape looks marvellous and I particularly like the pearl dark grey half barrels which have not appeared in this colour before. Trans-orange 3x3 dishes are fitted inside each nacelle, giving the impression of an attractive glow.
 View image at flickr
The engines are fully furnished with authentic mechanical details. These include heat exchangers represented by dark bluish grey megaphones as well as fuel and oxidiser pumps which are formed using pearl dark grey pantographs. The latter is a particularly effective use of an unusual element as the pumps are arranged in horizontal bands, just as the contact strips are situated on a pantograph. I am delighted to confirm that this attention to detail is typical of the entire set.
 View image at flickr
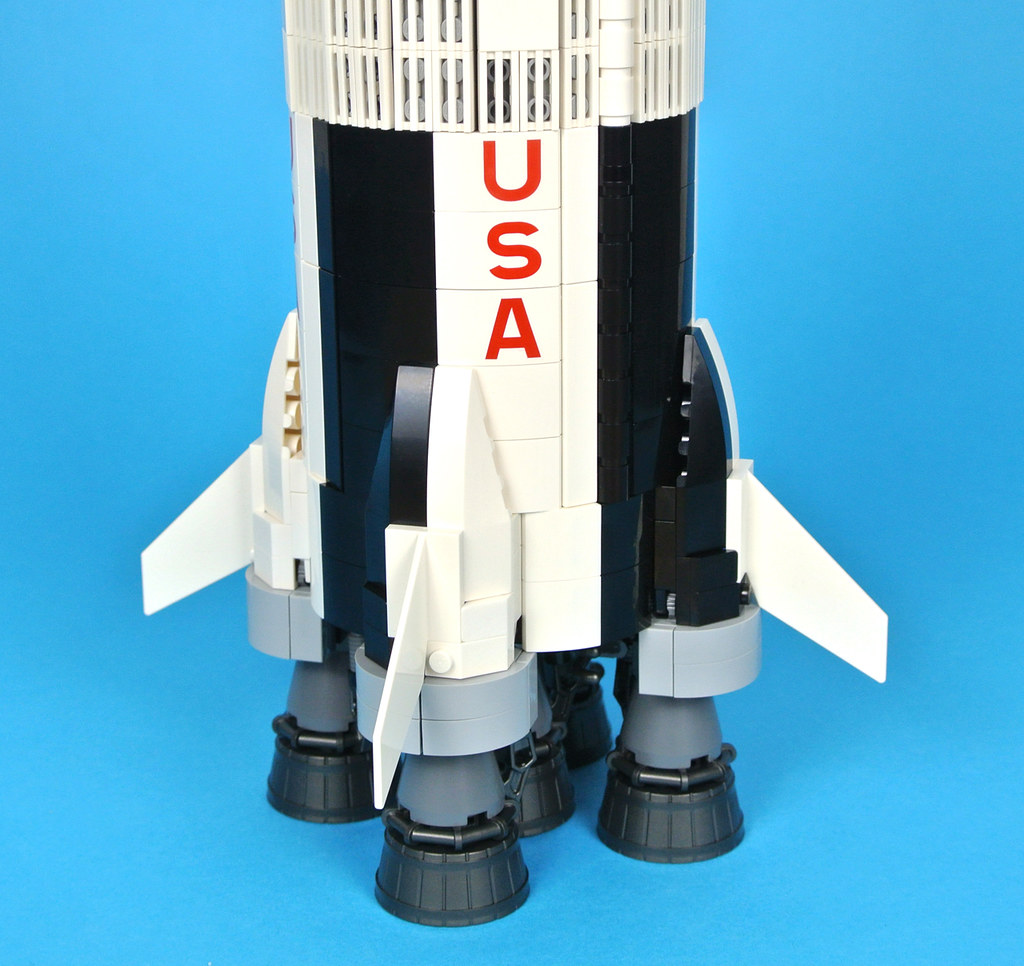
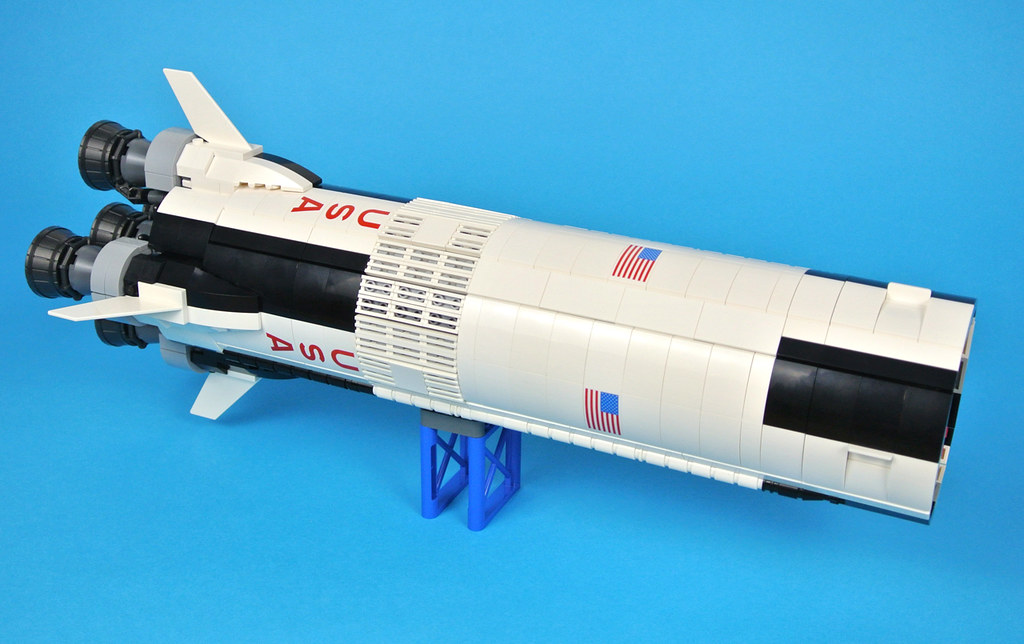
Four rocket fins are situated around the base of the model. Their shape is not perfect but could not have been improved upon without the creation of a new element. However, it would have been nice to see a black surface on one side in replication of the real Saturn V. The black and white stripes are perfect though and I like the printed 'USA' lettering which runs down four sides. All of the decorated components are printed, as we have come to expect of the LEGO Ideas range in recent years.
 View image at flickr
This model lacks fuel tanks inside but the texture of the intertank structure is present on the exterior and is represented by a band of 1x2 grille tiles running around the entire circumference of the rocket. These present an effective contrast with the texture of the smooth curved slopes and are arranged in a radial pattern using clips which produces a near-perfect circle. Rows of 1x3 and 2x3 curved slopes are similarly successful in forming an even shape, broken only by the cable tunnel which stretches from the engines at the base to near the top of the first stage.
 View image at flickr
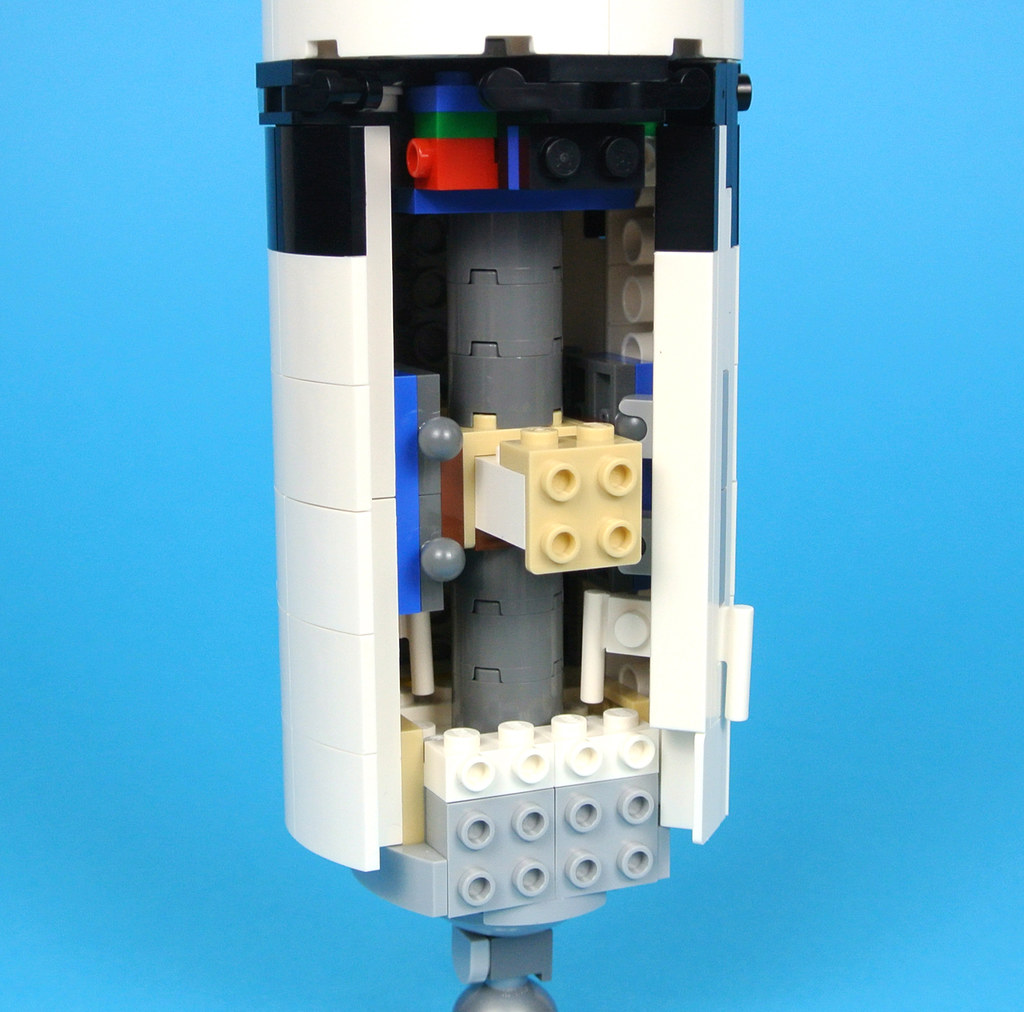
It seems inevitable that a set of this size and shape would feel fragile, particularly given the divisions between each rocket stage. In fact, it is incredibly sturdy and can easily be held in one hand, although I would recommend holding it in two during flight as the hull panels are very smooth. Removing these panels reveals the secret to its stability as an entire second cylinder is hidden inside the model. The outer panels are then attached using columns of brackets and these link the cylinder sections which would otherwise only be connected by a few studs. This construction method works brilliantly and fitting each segment in place is a very satisfying process.
 View image at flickr
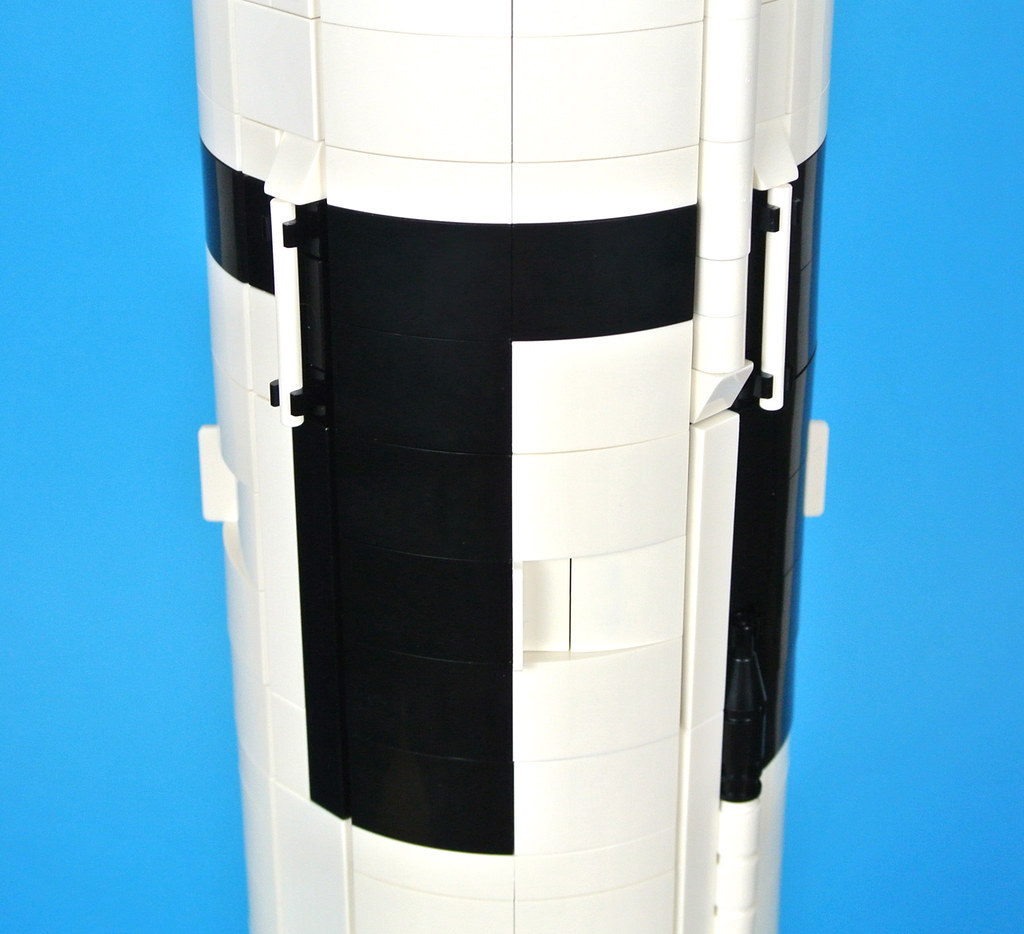
The details continue as four American flags are printed on curved slopes towards the top of the first stage and the black stripes which appear on the Apollo 11 rocket are also present. Similar designs are painted on each Saturn V and they are intended to demonstrate the roll of the vehicle within the atmosphere, although they also serve to distinguish each rocket as the markings were unique on every Apollo mission.
 View image at flickr
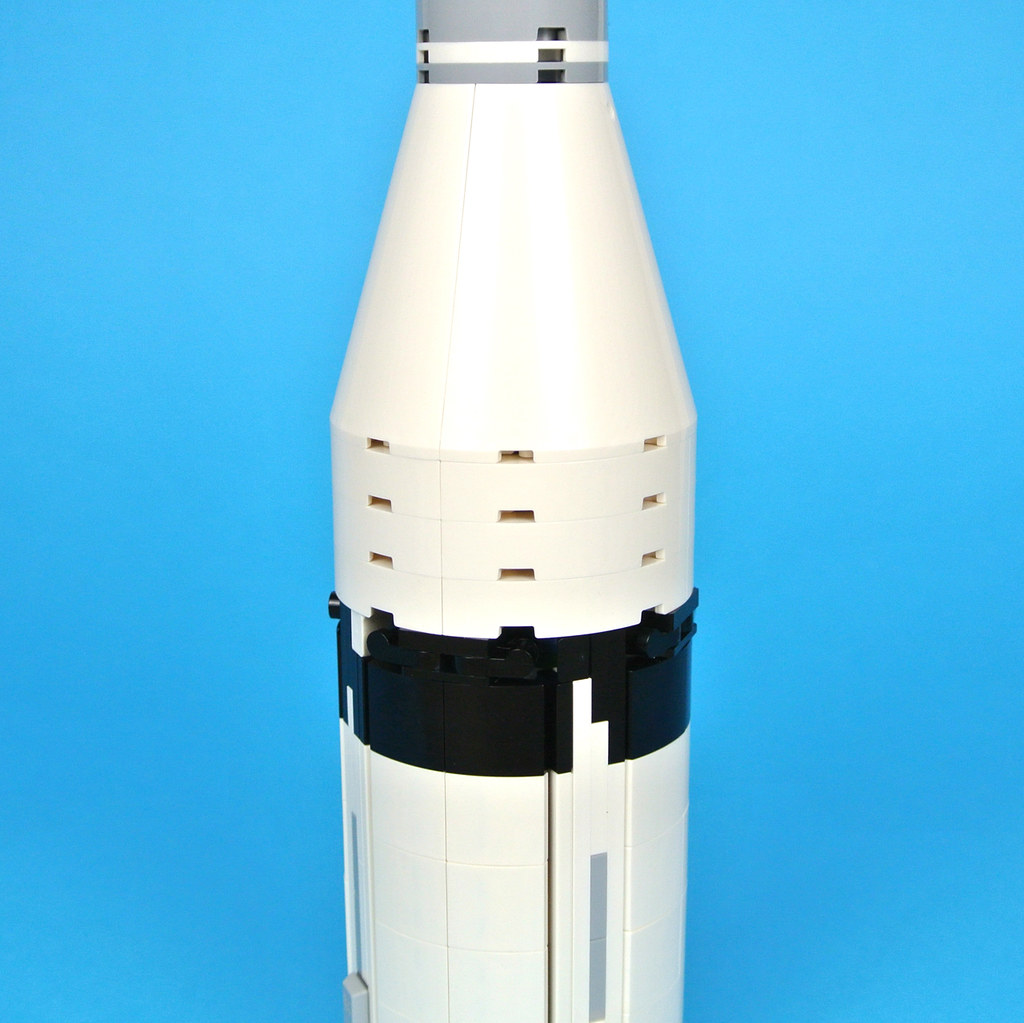
The dividing line between the first and second stages is almost invisible, as demonstrated in the image below. These two sections are connected by eight clips but they can be pulled apart with ease and the upper linkages are sufficiently strong that they will not be dislodged even by a sudden jolt of separation. In reality the division occurs in two movements as the fuel tank falls away before the forward skirt is ejected to reveal the second stage engine nacelles. Such a subtle feature could probably have been included but would certainly have compromised the structural integrity of the Saturn V so I am glad that it has been left out.
 View image at flickr
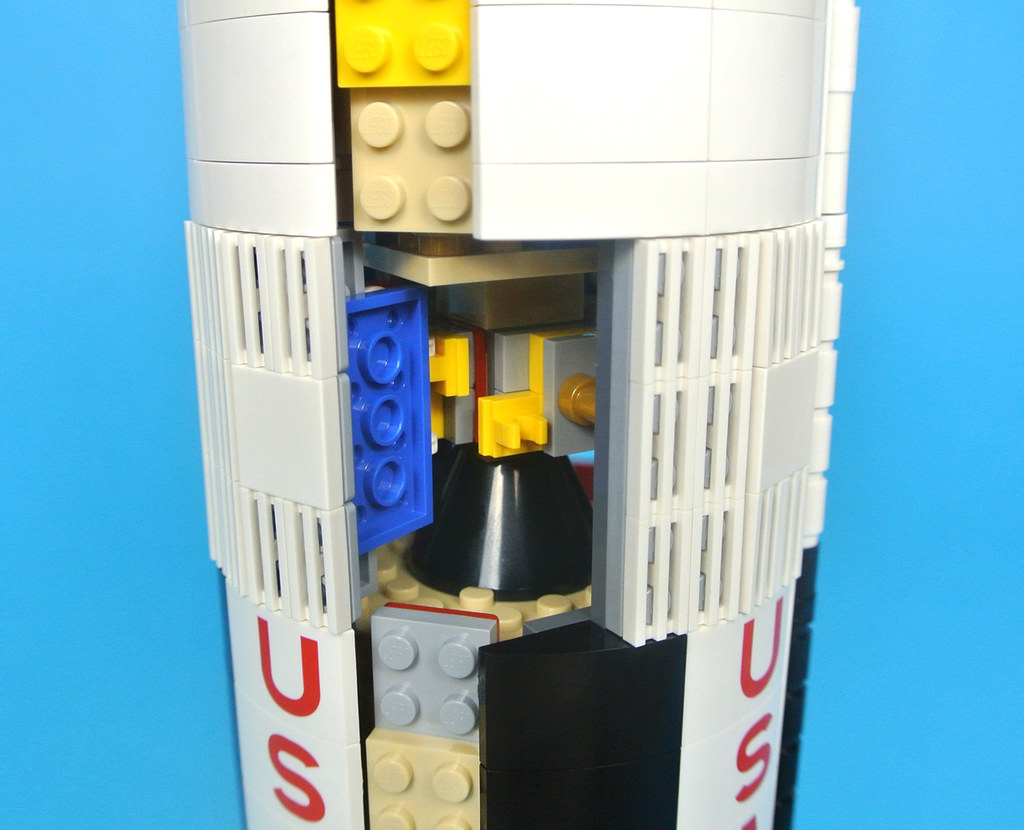
As the first stage begins to burn up in the atmosphere, the remainder of the rocket continues its journey towards the Moon. This is powered by five J-2 engines which include some attractive pearl silver wheel elements and trans-orange 1x1 round plates representing flames glowing inside the nacelles. I like the light bluish grey slopes surrounding the engines which form a similar shape to that seen on the real vehicle and slot neatly into the first stage.
 View image at flickr
Bars are clipped to the sides of the rocket and these represent the liquid hydrogen feed and recirculation lines which connect the fuel tank with the engines. Printed tiles line the cylinder and these are faithful to the real rocket, as is the additional textured ring which runs around the top of the second stage and forms the second intertank structure.
 View image at flickr
The model begins to taper towards the top and the first angled area of the hull is cleverly created using 4x4 wedges and curved slopes mounted on hinges. These alternating black and white stripes look brilliant but this configuration is more reminiscent of Apollo 10 than Apollo 11, with the black stripes on the latter being shorter. You could easily resolve this by swapping the black 2x2 curved slopes for white ones, although I actually think the present design looks excellent and intend to leave it as it is. Customisation options such as this are possible throughout the entire model, although replicating some of the Apollo mission markings may require careful planning during the construction phase.
 View image at flickr
The second stage is jettisoned to expose the single J-2 engine which fires soon after, launching the rocket beyond its orbit trajectory and towards the Moon. This engine is identical to those below but for its mounting on the light bluish grey thrust structure and the use of a 1x1 round tile rather than a plate to represent the glowing flames. The third stage is only connected to the second by four clips but it still remains absolutely rigid during flight.
 View image at flickr
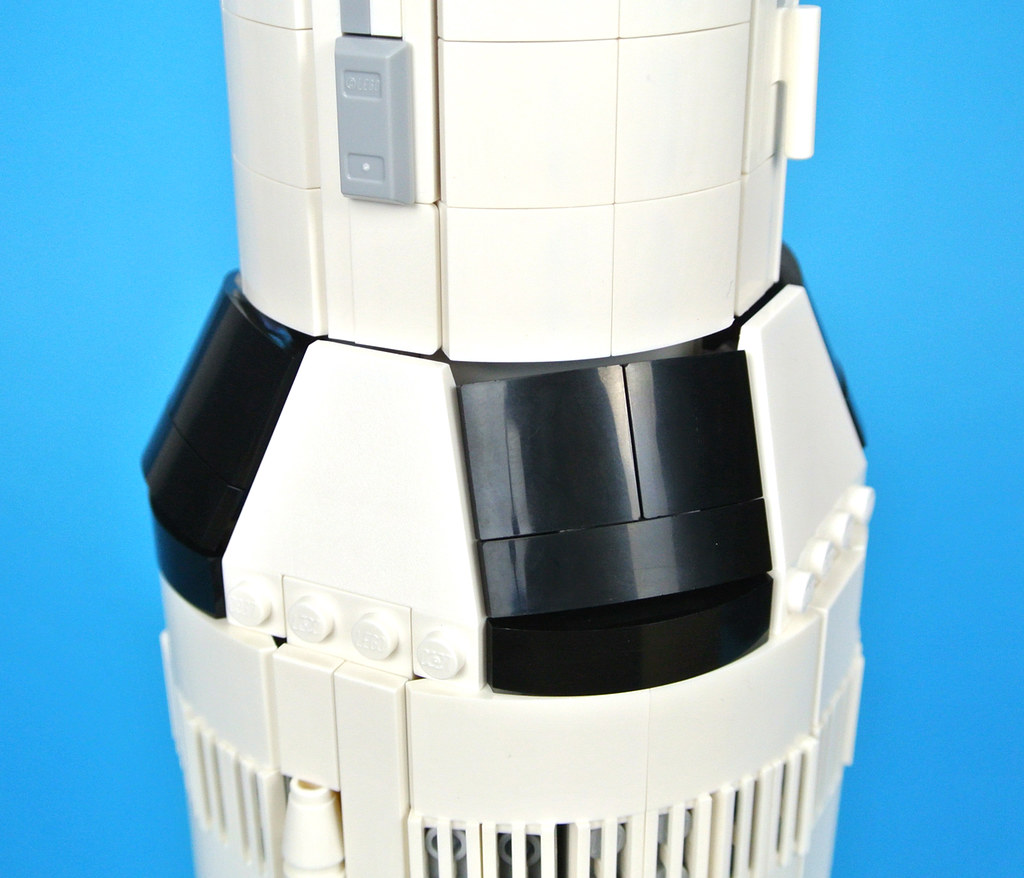
I love the shaping of this section as the construction techniques alter slightly to reflect the smaller diameter of the cylinder. Ball joints are used to connect four hull panels while the other four consist of curved slopes. The resultant model looks brilliant, with some grey mechanical details on the sides and an authentic black band around the top which includes some white areas, just as on the real Saturn V.
 View image at flickr
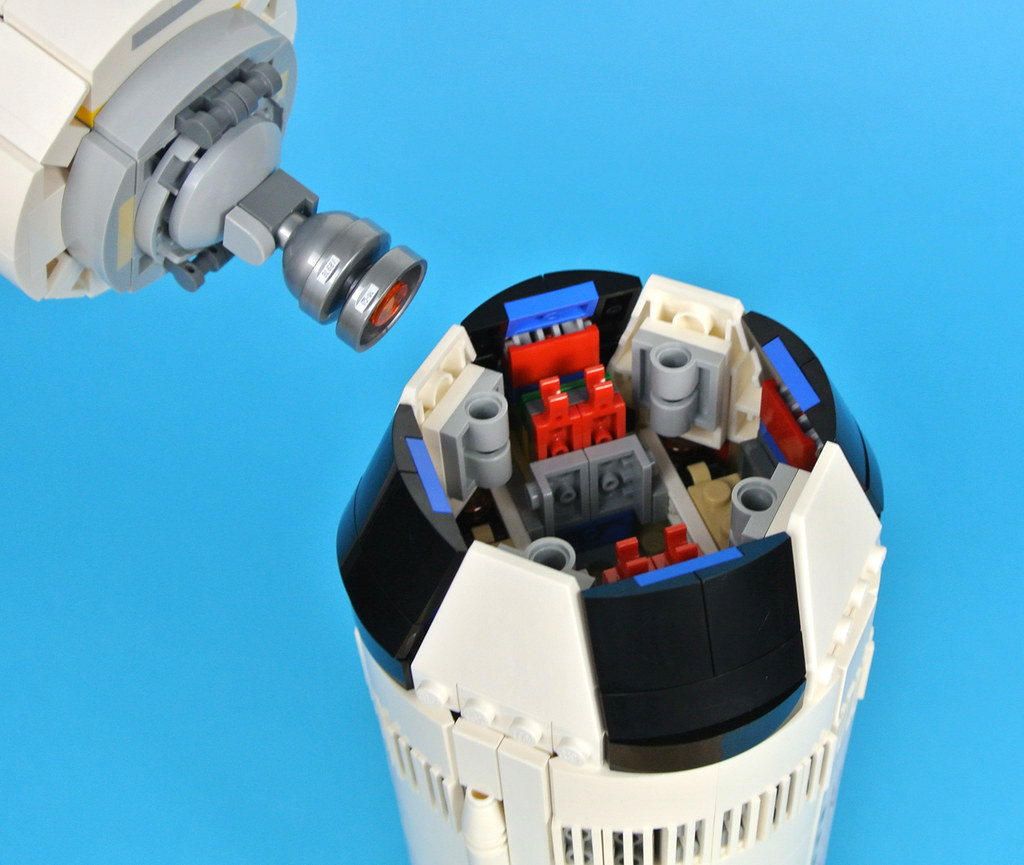
The rocket tapers further as we reach the command and service modules. These large conical elements are perfect to represent the lunar module adapter and they can be removed to expose their cargo as the Apollo spacecraft pulls away from the final stage of the Saturn V rocket. I should acknowledge that in reality the adapter broke into four equal sections whereas this splits into only two, although this is unimportant in my opinion.
 View image at flickr
The launch escape system at the top of the rocket is ejected early in the flight, shortly after the first stage. This includes a latticed design consisting of white taps with a black Technic axle in the centre and it looks splendid, ensuring stability as well as accuracy. You can even remove the 1x1 cone at the tip of the jettison motor tower, recreating the breakaway 'Q-ball' cover which is withdrawn as the Saturn V leaves the launch pad, exposing and activating the sensitive nose cone instruments!
 View image at flickr
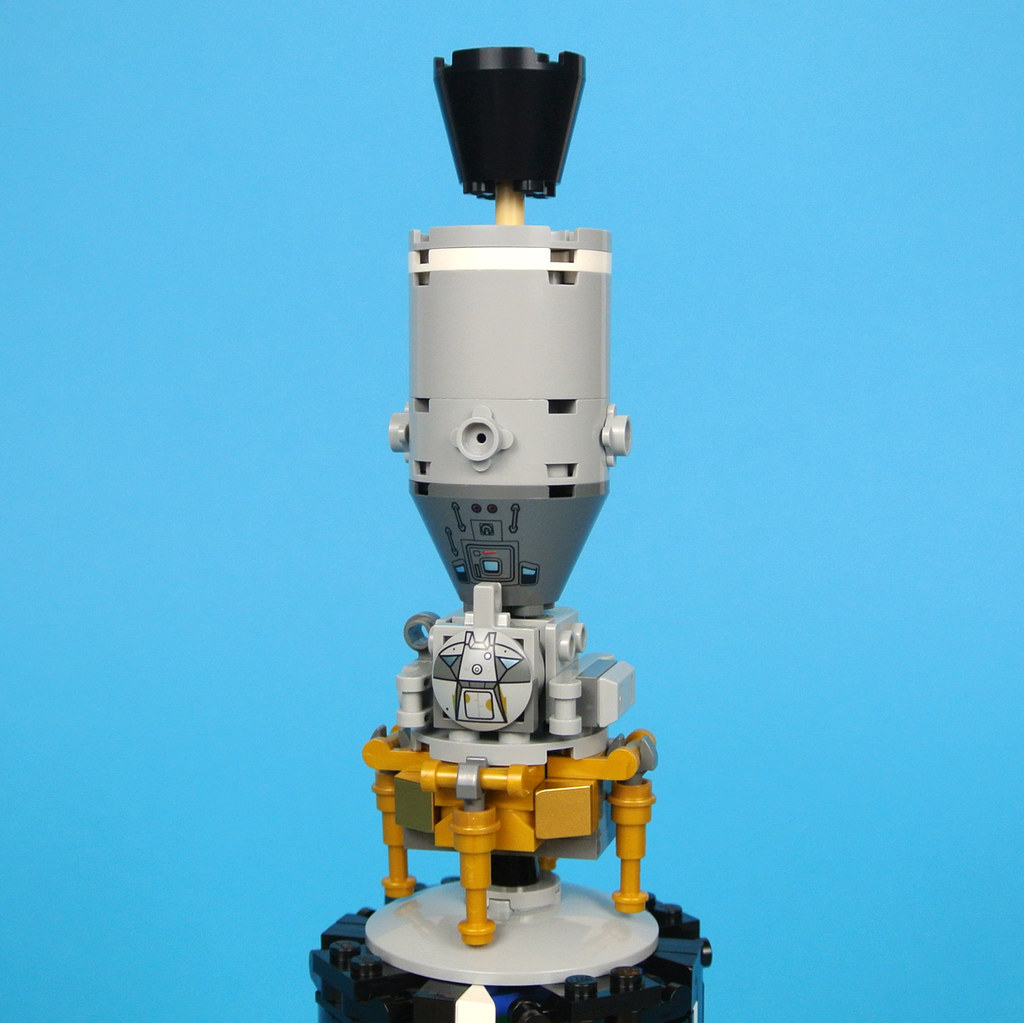
The firing of the launch escape system removes a white cover from the command module during real rocket launches but on this model you must instead swap them out. An alternative dark bluish grey command module is included for this purpose, featuring a printed hatch and some grips alongside an exposed Technic axle. This is used for the precise lunar module docking procedure and slots into a hole on top of the lunar module, as shown in the image below.
 View image at flickr
This set yields lots of pieces in new colours but my favourite is the light bluish grey flower, four of which are used to form the reaction control thruster quads for manoeuvring the spacecraft. The engine nozzle is the primary source of propulsion though and this is attached using a tan Technic pin which looks slightly awkward surrounded by muted shades of grey and black. It is testament to the high quality of the set that this very minor issue is probably the only thing that I would change.
 View image at flickr
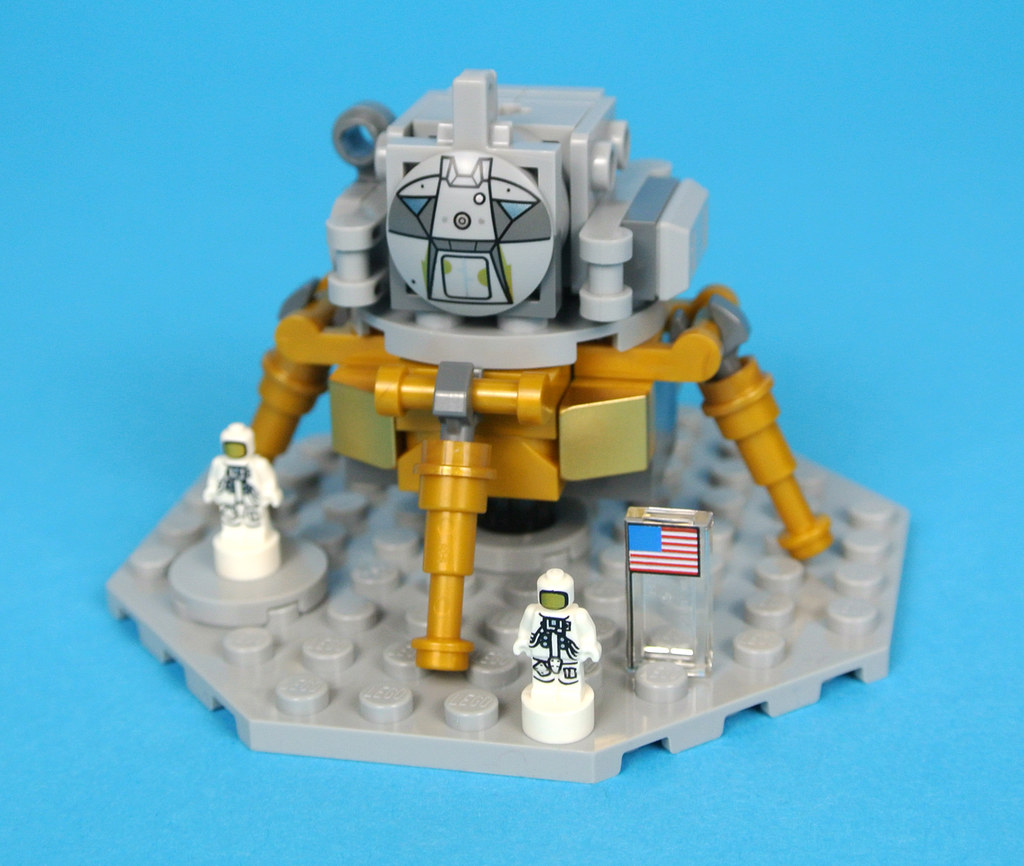
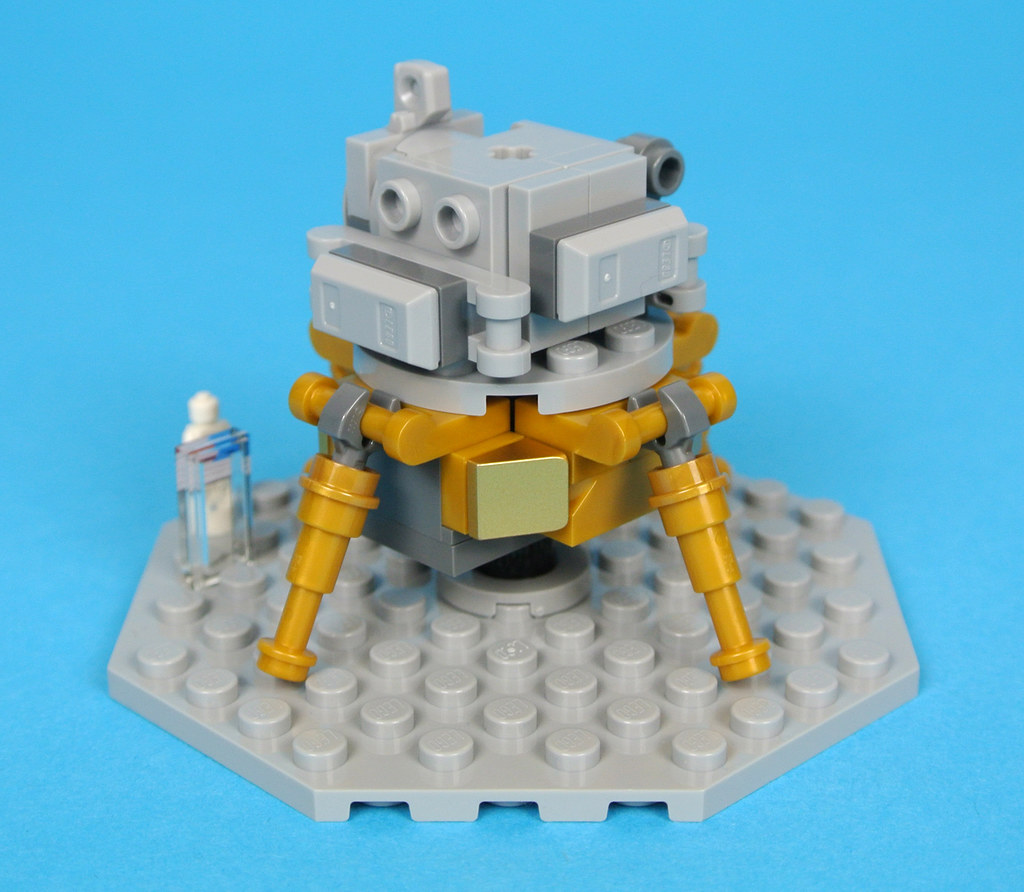
An octagonal section of the Moon's surface is also included and this provides a perfect base to display the lunar module upon arrival at its destination. The exposed studs are reminiscent of the cratered surface of the Moon and a tiny American flag is printed on a trans-clear 1x2 tile. This is placed between two studs so makes use of a technique which has only recently come back into favour with LEGO designers, having also appeared in 75827 Firehouse Headquarters last year.
 View image at flickr
The lunar module itself is highly detailed to match the standard of the Saturn V, including four landing pads, the rendezvous radar antenna and the egress hatch which is printed on a 2x2 slider. This looks great and lines up perfectly with where the ladder would be so you can recreate the moment of Neil Armstrong's first steps on the lunar surface. The black descent thruster underneath is represented by a cone and fits onto the centre of the octagonal plate for display of the lunar module and the astronauts outside.
 View image at flickr
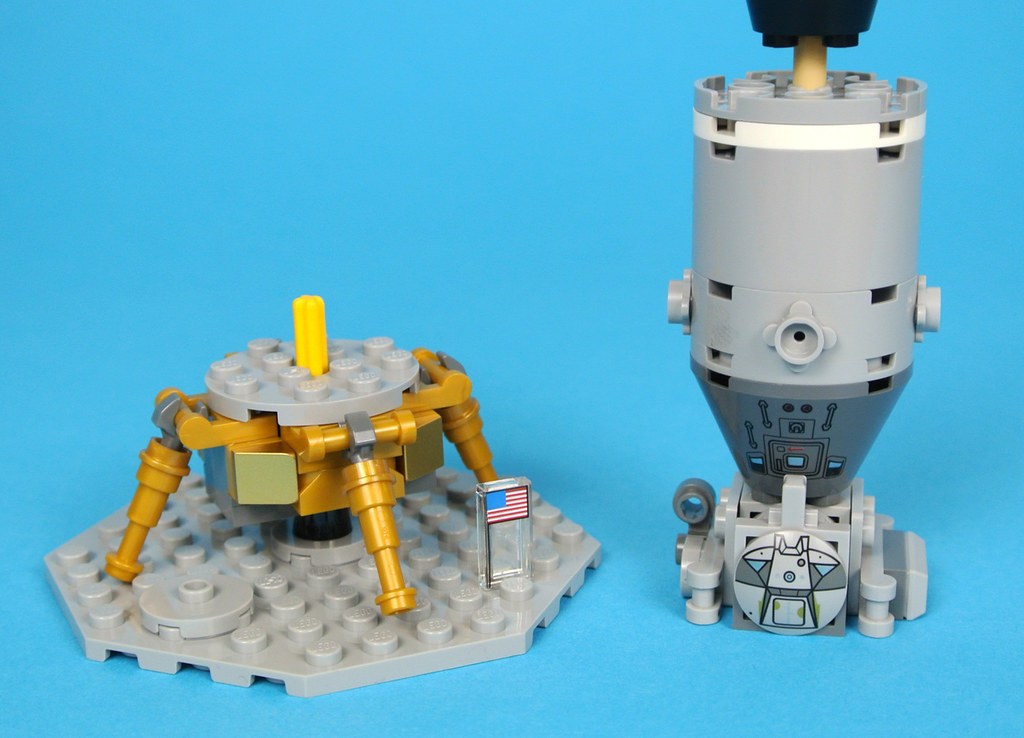
I like the combination of pearl gold and metallic gold elements which replicate the Kapton foil blankets seen on the real craft and the octagonal shape of the descent stage has been rendered quite nicely. This is left behind on the lunar surface when the astronauts return to the command module and the LEGO model includes a matching feature which allows you to launch the ascent stage. They are connected by a Technic axle so are easily separated and you can still reconnect the ascent stage with the service module without the legs attached.
 View image at flickr
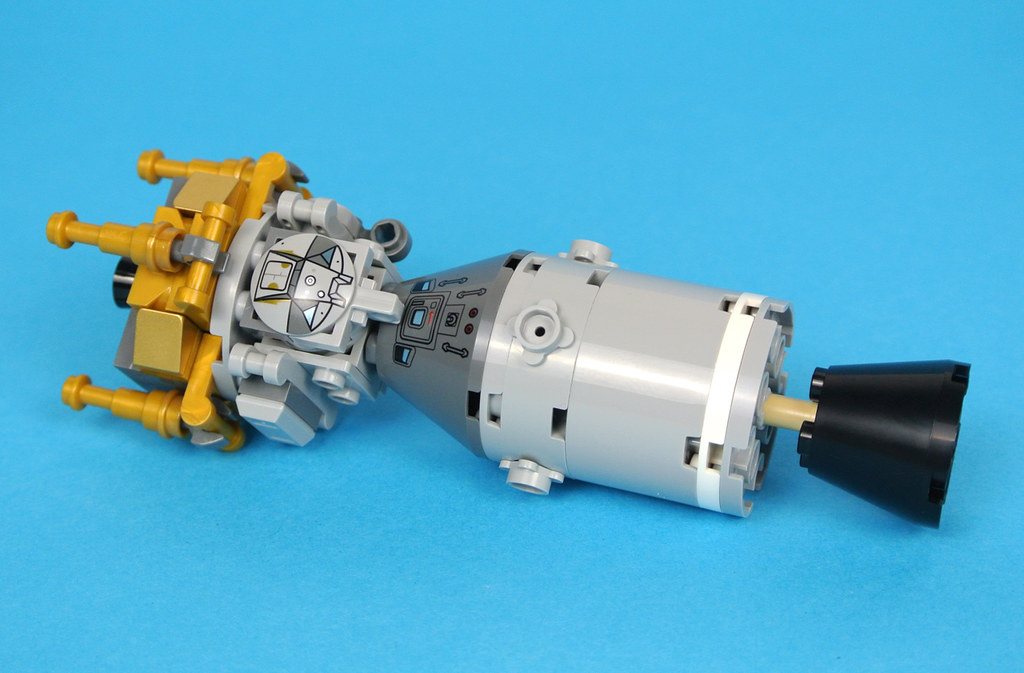
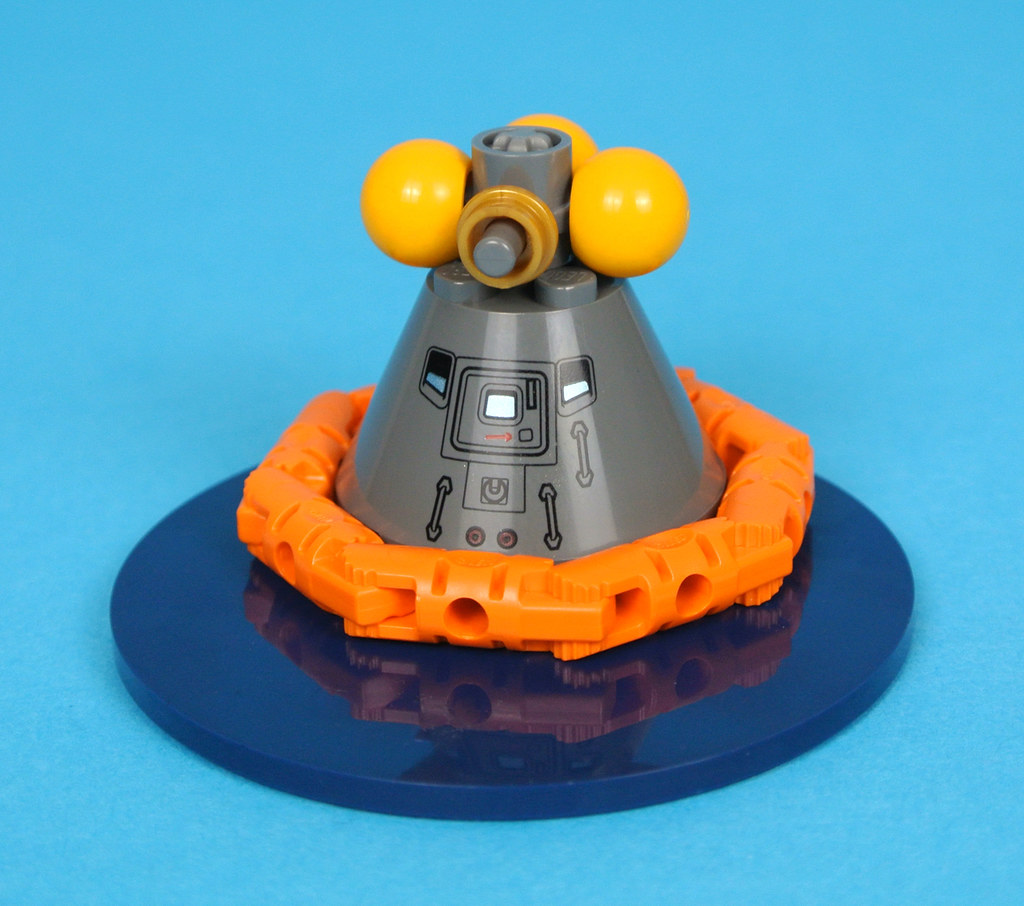
The command module detaches from the service module in readiness for its descent through Earth's atmosphere. Finally, the command module splashes down in the ocean, with a series of floats inflating to ensure that it does not sink. An 8x8 round plate is included for displaying the splashdown and the grey Technic axle is used once again to attach the flotation balloons which right the command module in the event of inversion. A flotation collar is also fitted in place and this is represented by a ring of click hinges which rests around the 4x4 cone.
 View image at flickr
I had imagined that displaying the model vertically would be a nerve wracking experience given the extraordinary height of the Saturn V. In fact it is remarkably stable, with the engines evenly distributing the weight over an area of about twenty studs. However, you might also wish to display the model horizontally or with the stages separated and three blue stands are included accordingly.
 View image at flickr
The rocket rests securely on each support stand and it looks marvellous in any configuration. I appreciate the versatility of these support structures and love that the designers chose to include blue 1x6x5 girder panels in reference to the Saturn V rockets on display at Kennedy Space Centre and at the U.S. Space and Rocket Centre in Alabama. This detail is representative of the care and attention which has been applied to the entire model and I applaud both the fan and set designers for their extraordinary efforts in this regard.
Overall
21309 NASA Apollo Saturn V could well be my favourite set! The model is of exceptional quality, with an authentic design for its entire height and some tremendous functions which offer considerable play value as well as numerous options for display. The construction is thoroughly enjoyable despite instances of repetition and I love the tiny astronaut microfigures included to show the sheer scale of this technological wonder.
 View image at flickr
I see no feasible improvements which could be made to the Saturn V and on that basis it receives my highest recommendation. Furthermore, the price of £109.99 or $119.99 seems like a great deal, not only in relation to the piece count but also given the size of the completed rocket. Whatever your age or interests I think this is an essential addition to any LEGO collection and anticipate that it will sell out very quickly on the 1st of June. Thanks once again to Felix Stiessen, Valérie Roche, Carl Merriam, Mike Psiaki and Austin Carlson for creating such an incredible product!
I hope you have found this review informative. Let us know by liking this article and share your thoughts on the set in the comments below.
This set was provided for review by The LEGO Group but the review is an expression of my own opinions.
206 likes
Lego Saturn V Release Date
Source: https://brickset.com/article/27956/review-21309-nasa-apollo-saturn-v
Posted by: beckpasm1937.blogspot.com
0 Response to "Lego Saturn V Release Date"
Post a Comment